Quantcast
Channel: 簡睿隨筆
Viewing all 904 articles
Browse latest View live

命令行:快速縮減圖片大小的方法

$
0
0

在錄製YouTube影片後,很重要的是製作縮圖,我目前是直接在Filmora裡用多個圖層的方式堆疊出需要的圖片,再用畫面快照產生出縮圖圖片。但有時圖片大小會超過YouTube允許的2MB,為了減化縮減圖片大小的步驟,寫了批次檔,使用imageMagick來做圖片resize的操作:

▼ resize.bat

set SIZE=84
if NOT "%2"=="" set SIZE=%2
del new.png /q
c:\util\imageMagick\convert -resize %SIZE%%% %1 new.png
dir new.png

▼ 命令範例

resize snapshot_1.png
resize snapshot_2.png 75

Resize後的圖片是new.png,檢查大小無誤後即可上傳到YouTube。

1. 相關鏈接

##

您可能也會有興趣的類似文章


讓剪貼簿工具Ditto加上環境變數以方便在多部電腦場景下運行

$
0
0

Ditto是很方便的Windows剪貼簿工具,我通常會以可攜的方式將Ditto放在Dropbox裡執行,但公司、家裡同時執行時,經常會發生Ditto.db資料庫衝突的狀況,最後將資料庫檔名加上用環境變數的方法解決。

1. 設定

  • 選項→一般,Database Path由Ditto.db修改成 Ditto-%USERDOMAIN%.db

gh|700

2. 相關鏈接

##

您可能也會有興趣的類似文章

查看主機重啟與Windows Update的記錄的方法

$
0
0

查看主機重啟與Windows Update的記錄。

1. 主機重啟

查看Windows重新啟動的記錄。

  1. 執行事件檢視器 eventvwr

  2. 建立自訂檢視
    gh|300

  3. 勾選系統記錄,識別碼 30
    gh|700

  4. 命令新建立的檢視
    gh|700

2. 更新記錄

gh|700

您可能也會有興趣的類似文章

快速建立Windows Defender Firewall 封鎖IP的Command Line命令

$
0
0

1. 建立與設定規則

要透過Windows Defender Firewall 來封鎖多個IP時,使用視窗的方式操作步驟頗多,可改用下列命令,能飛快的建立好相關規則。

  1. 建立封鎖IP的規則

    netsh advfirewall firewall add rule name="Blacklist" dir=in action=block remoteip=w1.x1.y1.z1
  2. 添加新的IP,必須使用完整的IP清單

    netsh advfirewall firewall set rule name="Blacklist" new dir=in action=block remoteip=w1.x1.y1.z1,w2.x2.y2.z2
  3. 現有的remoteip可以用show查詢顯示

    netsh advfirewall firewall show rule name=Blacklist

2. 設定輸出log

netsh advfirewall set currentprofile logging filename %systemroot%\system32\LogFiles\Firewall\pfirewall.log
netsh advfirewall set currentprofile logging maxfilesize 4096
netsh advfirewall set currentprofile logging droppedconnections enable
netsh advfirewall set currentprofile logging allowedconnections enable

##

您可能也會有興趣的類似文章

Obs148|Slash Commander 斜線命令快速插入表格、Callouts、程式碼區塊等

$
0
0

如果你更習慣使用鍵盤的話,Slash Commander能更方便的協助你快速插入各式Markdown語法。

它的預設使用方法很簡單,就跟Notion一樣只要輸入「/」就可以了。

[!COMMENT]+ v1.5右鍵功能表

  • v1.5的編輯區右鍵功能表新增了Format、Paragraph、Insert選項,可快速選用常用的Markdown標籤
  • Insert選項功能類似Slash Commander,但項目無法自訂

1. 安裝與使用

  1. 先停用核心外掛程式裡的斜線命令。
  2. 安裝並啟用Slash Commander外掛。

2. 使用重點

  1. 在每行開頭輸入「/」就會出現插入選單,點擊要插入的標的
  2. 輸入「/」後再輸入過濾用的字串以快速找出符合的命令
  3. 設定
    1. Command trigger:觸發的字串,不想要「/」時自行變更
    2. Only on new line:若想在行內而非行首也能觸發的話則不啟用
    3. Bindings→Add command:彈出選單的項目設定。先選擇命令,再選擇圖示,變更命令顯示文字,最後按【Save】

3. Bindings設定

綁定命令右側有三個功能圖示,第一個是觸發模式,第二個是使用模式,第三個是刪除。

  1. 觸發模式:Aynwhere(任何位置)、Newline only(行首)、Inline only(行內)
    1. 區塊的Markdown可設定為行首:例如Callouts、Admonitions等可設為行首
    2. 行內Markdown則可設定為Inline only
  2. 使用模式:Any、Desktop、Mobile、This Device等四種

gh|700

4. 相關鏈接

5. 教學影片

##

您可能也會有興趣的類似文章

定時刪除Gitea的SQLite3資料

$
0
0

為了部署方便,Gitea一開始建置時使用的是SQLite資料庫,當操作時間一久,累積了多個操作記錄,為了提升系統執行效能最好定期刪除舊的資料,因此以下列方法建立自動刪除SQLite資料的自動排程步驟。

清理資料的SQLite script是:

delete from action where created_unix < 1693497600;
vacuum;

小於後的時UNIX時間數值。

計算一個月前的UNIX時間

SQLite action資料表的建立時間使用的是UNIX時間的數值,以ut-cli的ut.exe來計算前一個月的時間數值。

▼ 用下列命令取出UNIX時間

ut generate -d -1month >> delete_data.sql

cmd.exe不輸出換行的方法

批次檔不輸出換行的方法是使用echo | set /p="命令"

完整內容

cd /d c:\gitea安裝資料夾\data
echo|set /p="delete from action where created_unix < " > delete_data.sql
ut generate -d -1month >> delete_data.sql
echo ; >> delete_data.sql
echo vacuum; >> delete_data.sql

type delete_data.sql

set DIR=c:\gitea安裝資料夾\data
set DD=%date:/=%
copy %DIR%\gitea.db %DIR%\gitea.db.%DD% /y
sqlite3 %DIR%\gitea.db < %DIR%\delete_data.sql
echo %DATE% %TIME% > delete_data.log
dir %DIR%\gitea*.* /od >> delete_data.log

##

您可能也會有興趣的類似文章

# Obs149-左邊長筆記,右邊卡片的編輯佈局:Query Control, Note Gallary

$
0
0

有網友在Facebook的Obsidian社團問了一個問題:Obsidian如何比照Writeathon 写拉松的編輯佈局-左邊是長筆記,右邊是卡片的形式來方便撰寫內容。我試了下Writethon,它的編輯形式如下,左邊是編輯主體的筆記,右邊是參考的卡片(相關的其他筆記),卡片右上角的選項有複製引用和複製兩個功能,右邊也有搜尋卡片的輸入欄位可過濾出特定的卡片:

gh|700

我想到的在Obsidian裡實現類似形式的方法有兩個。

因為Obsidian預設沒有卡片式的瀏覽面板,因此額外建立一個工作用的筆記,以Query Control外掛或Note Gallery外掛來形成搜尋筆記的的過濾呈現樣式。

1. Query Control Plugin

[!WARNING]+ 注意❗
Query Control外掛尚未上架,請自行安裝或使用BRAT安裝。

1.1. 使用步驟

在工作筆記上以程式碼區塊輸入搜尋關鍵字與 tag 等條件,以顯示符合條件的筆記清單。

```query
美化
tag: #obsidian
renderMarkdown: false

1.2. 顯示筆記內容

1.2.1. 搭配Hover Editor

Query Control只會顯示關鍵字所在該行內容,無法顯示全部內容。可搭配顯示Hover Editor,在鏈接上按 Ctrl 以Hover Editor開啟筆記。

1.2.2. 搭配Callout/Admonition語法

另一個方法是複製搜尋結果,貼上後再於鏈接開頭加上 ! 以顯示其內容。可再搭配Callout語法(或Admonition)語法以形成摺疊式的樣式。

若清單行數較多時,可以使用正則運算式快速替換。若要在Obsidian裡使用正則運算式替換的話,可使用Global Search and Replace外掛。

  • Search: ^- (.*)
  • 替換為Callout: > [!NOTE]- $1\n> !$1\n
  • 替換為Admonition:
    ``ad-note\n!$1\n``\n

gh|700

2. Note Gallery Plugin

2.1. 使用步驟

在工作筆記上以程式碼區塊(不使用倒引號,使用三個波浪號)輸入搜尋query條件,以卡片格式顯示符合條件的筆記。

[!TIP]+ 技巧
query欄位可使用正則運算式:'/正則運算式/'

~~~~note-gallery     #           default | options
query: 'tag:#obsidian 美化'  # optional: anything you'd put into an obsidian search query
                     # make sure to wrap into single quotes for any regex e.g.: '/\d/'
debugQuery: false    # optional: false | true - display native search results to debug
#path: 300-R興趣/300-02-筆記工具/Obsidian          # optional: current note folder | path/to/folder - you don't **need**
                     # to use path if you are using query, path will source additional notes
recursive: true      # optional: true | false
limit: 20            # optional: 0 | any number
sort: desc           # optional: desc | asc
sortBy: mtime        # optional: mtime | ctime | name
fontSize: 6pt        # optional: 6pt | NUMBERpt | NUMBERpx
showTitle: false     # optional: true | false
~~~~

gh|700

3. 相關鏈接

Query Control Github:未上架,手動安裝或使用BRAT
Hover Editor GitHub
Global Search and Replace
Note Gallery GitHub

4. 教學影片

##

您可能也會有興趣的類似文章

DBeaver字體設定的操作

$
0
0

最近開始使用DBeaver當做獨立的資料庫查詢工具,主要是它的Community版本能免費使用。

[!TIP]+ 說文解字
beaver KK[ˋbivɚ]DJ[ˋbi:və] 是海狸,因此DBeaver用了海狸當做它的頭像。

gh|100

一開始使用時,SQL編輯區的字體偏小,搜尋了一下發現網路上的設定,找到的設定都是較舊的設置方法,測試了一下,變更SQL編輯區的字體大小的設定操作如下:

功能表 視窗→偏好設定→使用者介面→DBeaver fonts→Monospace font,點擊右側的Edit

gh|700

##

您可能也會有興趣的類似文章


Obs150|多重筆記標籤操作-新增與移除:Multi Tag、TagMany、Notepad++、EmEditor、VS Code

$
0
0

gh|700

1. 找出所有沒有標籤的筆記

where length(file.tags)=0列出存庫裡沒有標儲籤的筆記。

```dataview
table file.tags
from ""
where length(file.tags)=0
sort file.name
```

2. 新增標籤

針對特定資料夾新增標籤:使用Multi Tag或[TagMany]()外掛

2.1. Multi Tag

在安裝了Multi Tag外掛後,檔案瀏覽器的資料夾右鍵選單會有【Tag folder's files】。

gh|700

2.2. TagMany

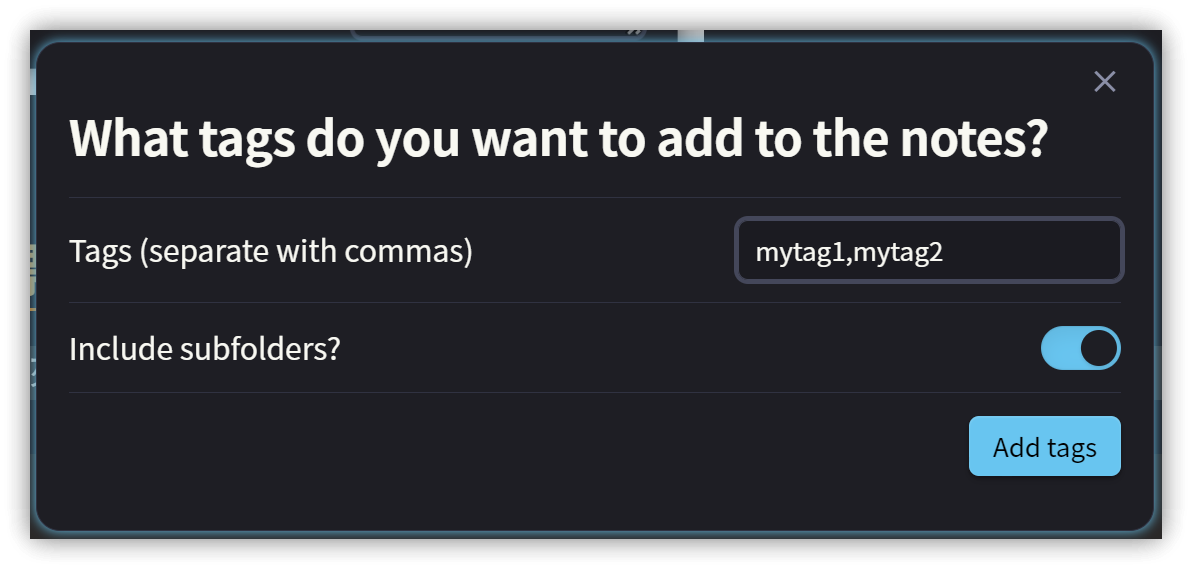
在安裝了TagMany外掛後,檔案瀏覽器的資料夾右鍵選單會有【Tag all notes in this folder】

  • 輸入標籤,以逗點分隔
  • 可勾選【Include subfolders】是否包含子資料夾

gh|700

[!WARNING]+ 警告
tags的值必須是陣列或清單格式
即:tags: [tag1, tag2, tag3]

 tags:
   - tag1
   - tag2
   - tag3

2.3. 標籤改名

使用Tag Wrangler外掛,在標籤面板以右鍵功能表內的【Rename】改名。
tag1|400

3. 移除標籤

3.1. EmEditor

功能表 搜尋→多檔取代或按 Ctrl+Shift+H</s pan>

  • 搜尋正則運算式:^ - -inbox\n,兩個空白+一個減號+一個空白,標籤是-inbox,再接換行符號
  • 取代為空字串
  • 所在資料夾:指定要操作的資料夾

gh|700

3.2. Notepad++

  • 功能表 【搜尋】→【取代】

gh|700

3.3. VS Code

  • 按功能表【編輯】→【在檔案中取代】或 Ctrl+Shift+R
  • 【使用規則運算式】圖示記得點選

gh|700

4. 相關鏈接

5. 教學影片

##

您可能也會有興趣的類似文章

使用RocketDock遇到了Windows Terminal的多實例問題

$
0
0

先前在Windows 使用大尺寸(32吋4K)螢幕時應具備的方便工具裡提到:因為「32吋的天和地不好觀看,以致工作列點擊麻煩了些,加上Dock以方便點擊」,因而開始使用了WinStep公司開發的Nexus Dock。最近將Nexus換成了免費、功能相差無幾的RocketDock,但在將Windows Terminal加到Dock上時,卻遇到了執行實例的問題。

似乎是RocketDock無法識別已經執行了的Windows Terminal,每次點擊Dock上的Windows Terminal圖示就會額外又開啟新的Windows Terminal視窗(變成多實例了),而我希望的是永遠是同一個Windows Terminal視窗(單實例)。

查看了Windows Terminal的設定,發現有啟動的參數能指定開自己做成新視窗或附加到現有的視窗裡(變成新分頁):
gh|700

最後的解決步驟如下:

  1. 首先將New instance behavior設定為【Attach to the most recently used window】。
  2. 啟動Windows Terminal的設定,在參數欄位使用:focus-tab,將焦點設定到現有分頁。

gh|700

設定後,再點擊Dock上的Windows Terminal圖示就不會再開啟成新視窗或新分頁了。

##

您可能也會有興趣的類似文章

Obs151|幫Obsidian加上音樂-生產力火速大漲十倍!😂

$
0
0

安裝並啟用 Soundscapes 後,Obsidian狀態欄位立即增加播放與音量控制功能,方便寫筆記同時聆聽輕音樂。
可惜外掛目前有下列限制:

  • 音樂來源只限Youtube影片
  • 無法自訂站音源,目前有11個可選項目
  • 到作者GitHub提出想添加的音樂與原因,作者可考慮新增到選單裡
  • 無法在狀態欄位直接變更影片,必須在外掛設定裡設定,若是能直接變更會更方便

我直接修改了它的原始碼來加上自己想聽的音樂,依照我介紹的方法,你也能自行添加自己寫聽的音樂。

1. 自行添加音源

[!TIP]+ 注意!
請先備份 main.js 以防修改錯誤而造成無法使用的問題

  1. 編輯外掛的main.jsp:儲存庫/.obsidian/plugins/soundscapes/main.js
  2. 搜尋 nintendo
  3. 複製 nintendo: 整個區塊後複製成新的內容
  4. 修改複製後的內容成新的值,youtubeId欄位輸入想要聽的YouTube影片代碼(https://www.youtube.com/watch?v=影片代碼
  5. 注意 nintendo 區塊最後面的 } 後方必須有逗點(,)

gh|700

  1. 重新啟動Obsidian後,在Soundscapes外掛設定的選單裡就能找到新加的選項了

Enjoy!

2. 無法播放影片

[!WARNING]+ 注意
Soundscapes是使用嵌入YouTube影片的方法播放(iframe),某些影片若設置不許嵌入,那麼Soundscapes就無能為力了。

2.1. 測試影片能否被嵌入

<iframe width="650" height="315" src="https://www.youtube.com/embed/影片代碼" frameborder="0" allow="accelerometer; autoplay; encrypted-media; gyroscope; picture-in-picture" allowfullscreen></iframe>

下例是測試的影片:

  • 無法嵌入:E5yWN4oFsGg (Obsidian裡無法播放,網頁裡卻可以?未究原因)
  • 可以嵌入:kqZMgR6BnFY


3. 相關鏈接

4. 教學影片

##

您可能也會有興趣的類似文章

AHK59|使用VS Code開發AutoHotkey-編輯、執行與除錯

$
0
0

先前介紹過AutoGUI(改名為Adventure IDE)來開發AutoHotkey腳本程式,Adventure IDE是使用AutoHotkey語法來撰寫的開發環境,可惜它的最後版本是在2022年1月1日,不確定是否就此不再開發、維護了。

雖然其實我平時還是直接用文字編輯器來編寫AutoHotkey,但還是決定介紹使用微軟的VS Code(Visual Studio Code)來開發AutoHotkey的完整步驟,適合AutoHotkey的初學者用來入門,也歡迎想使用新的開發環境的朋友們觀看。

1. 安裝AutoHotkey v2.0

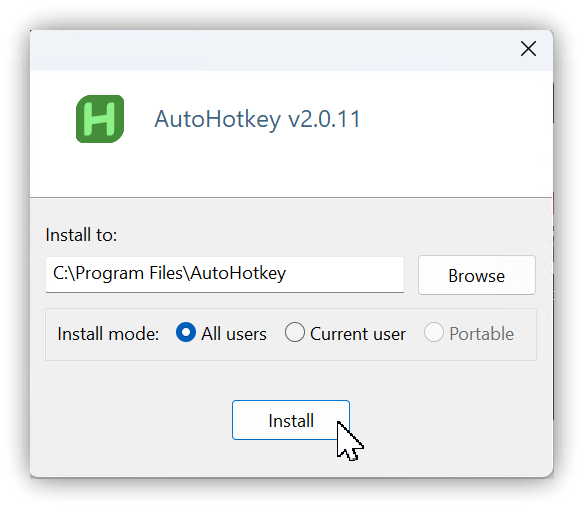
目前AutoHotkey最新版是v2.0.11,建議直接安裝最新版。

gh|400

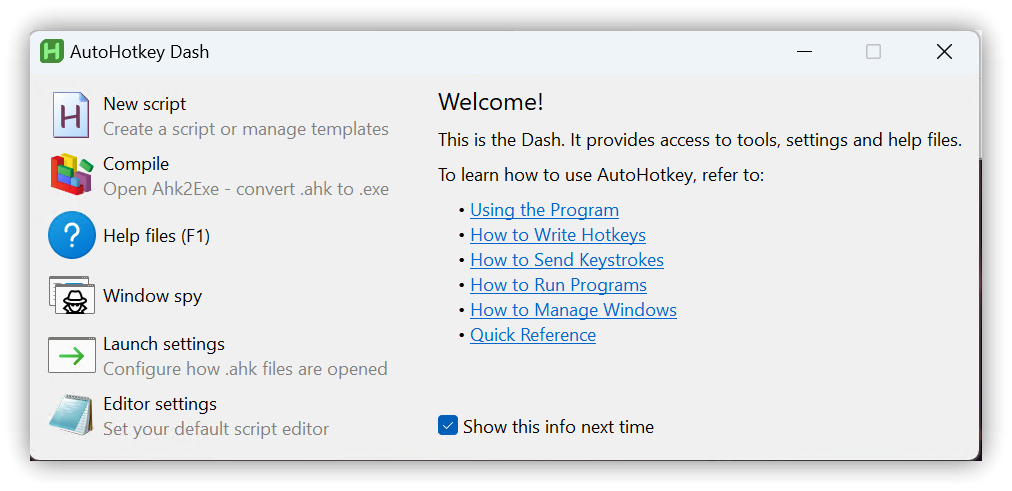
  • 安裝完成後會自動彈出AutoHotkey Dash,以當做使用AutoHotkey的入口應用程式
  • v2.0.11 只會安裝v2.0的應用程式,如果需要v1.x的舊版本的話,可以額外再執行下列的install-version.ahk
    rem 下載v1.37.01
    "C:\Program Files\AutoHotkey\UX\install-version.ahk"
  • v1.x下載後,會在原有的安裝資料夾裡新曾 v1.1.37.01 資料夾,內有v1.x的應用程式

gh|700

重要程式 檔案位置 說明
Dash C:\Program Files\AutoHotkey\UX\AutoHotkeyUX.exe UX\ui-dash.ahk AutoHotkey Dash入口程式(或搜尋Dash)
V2執行檔 C:\Program Files\AutoHotkey\v2\AutoHotkey64.exe 64-Bit的AutoHotkey應用程式
V2執行檔 C:\Program Files\AutoHotkey\v2\AutoHotkey.exe 指向AutoHotkey64.exe的符號連結
V1執行檔 C:\Program Files\AutoHotkey\v1.1.37.01\AutoHotkeyU64.exe 64-Bit的AutoHotkey應用程式

2. 安裝VS Code

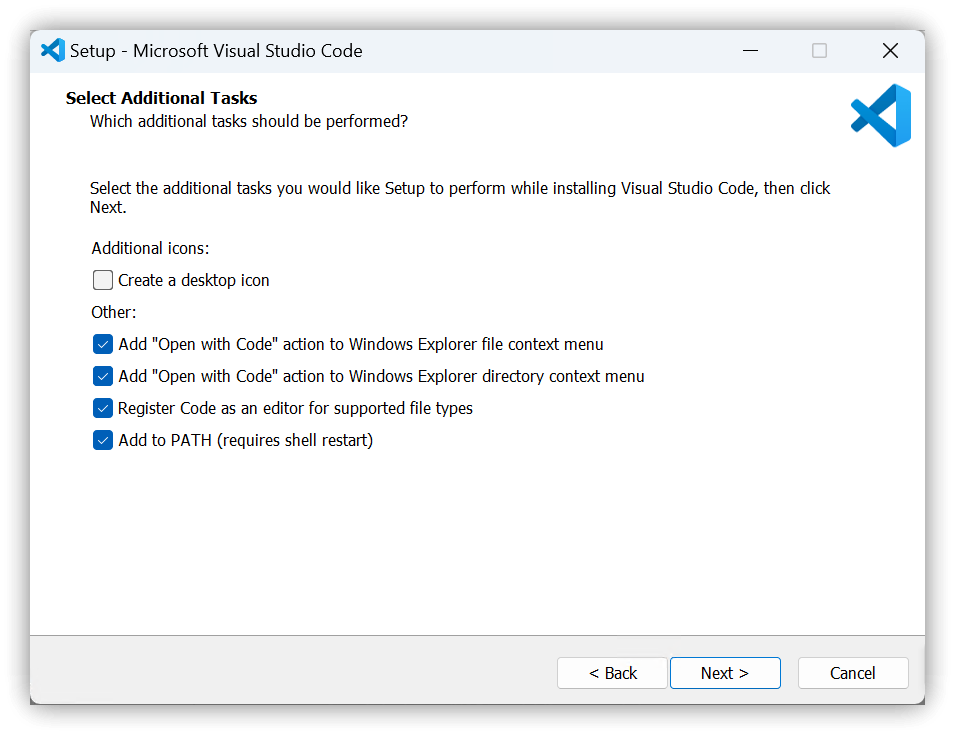
  • 下載System Installer:https://code.visualstudio.com/
  • 安裝資料夾:C:\Program Files\Microsoft VS Code
  • 在Setup對話窗裡建議勾選【Other:】開頭的兩個Add選項,以方便檔案總管的操作
    gh|600

3. 安裝VS Code擴充

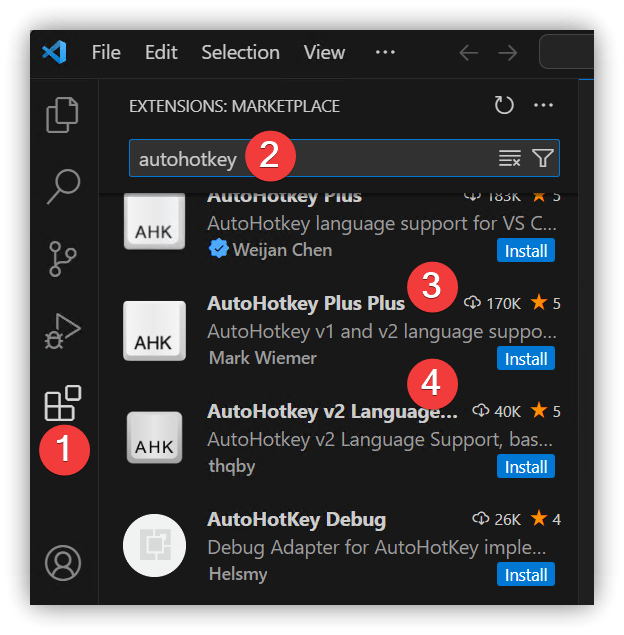
執行VS Code後,繼續安裝AutoHotkey 擴充:AutoHoeky Plus Plus與AutoHotkey v2 Language Support

  1. 點擊側邊欄第5個圖示擴充
  2. 輸入 AutoHotkey 以過濾出AutoHotkey相關擴充
  3. 先安裝AutoHotkey Plus Plus
  4. 再安裝AutoHotkey v2 Language Support

gh|500

4. 設定開發環境

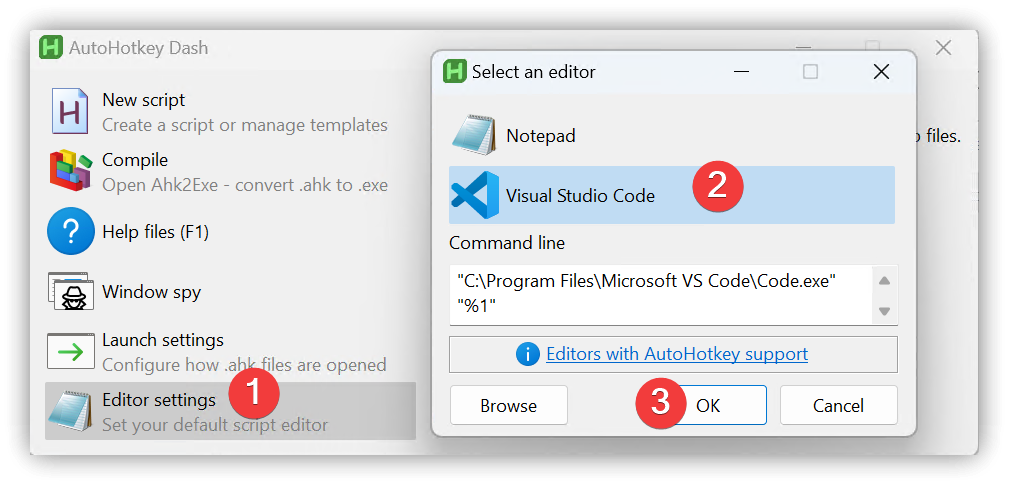
啟動AutoHotkey Dash,點擊【Editor settings】→點選Visual Studio Code→OK

gh|700

5. 撰寫第一支測試腳本

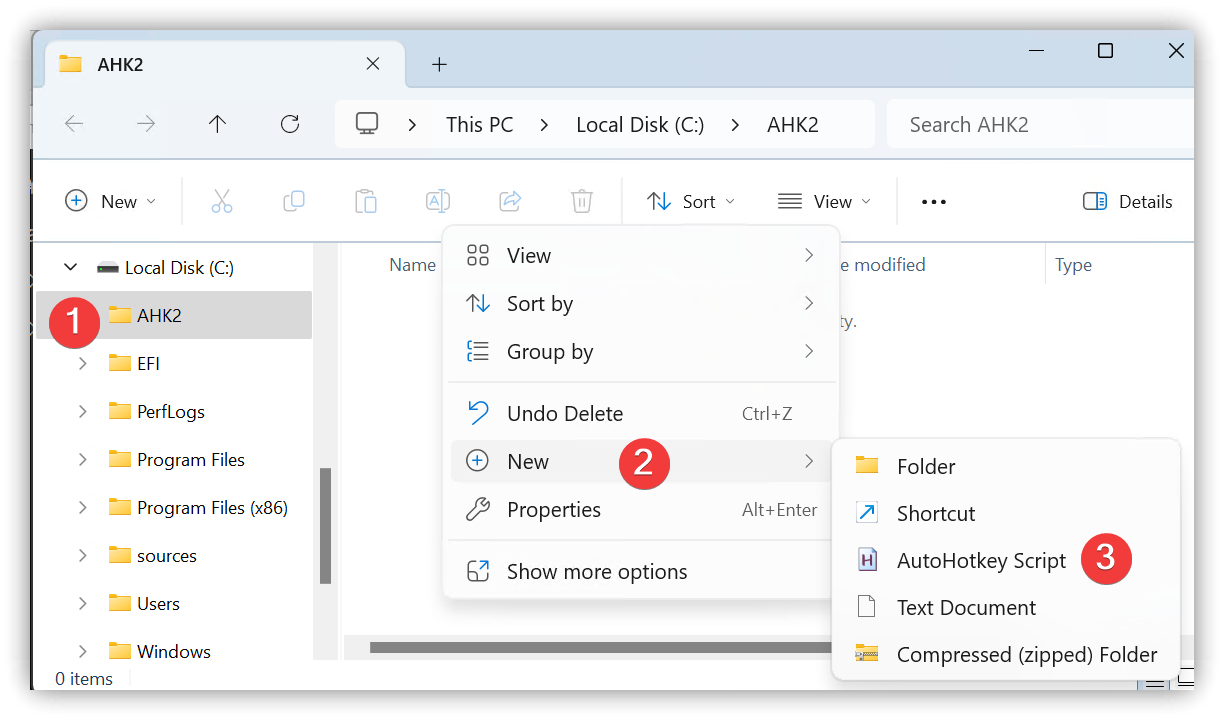
  1. 建立存放腳本檔案的資料夾,例如:用C:\AHK2
  2. 用檔案總管開啟C:\AHK2,右鍵功能表→New→AutoHotkey Script

gh|700

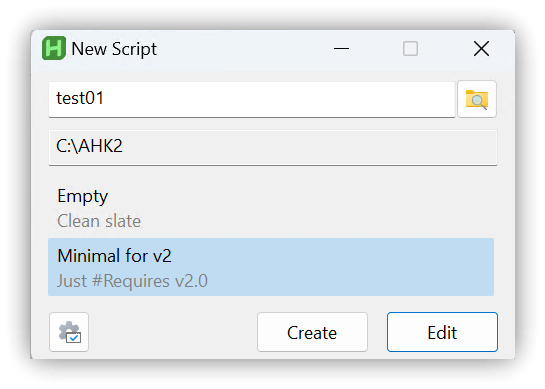
  1. 輸入檔名與模板種類,下圖使用了「Minimal for v2」模板,再點擊【Create】
    gh|700

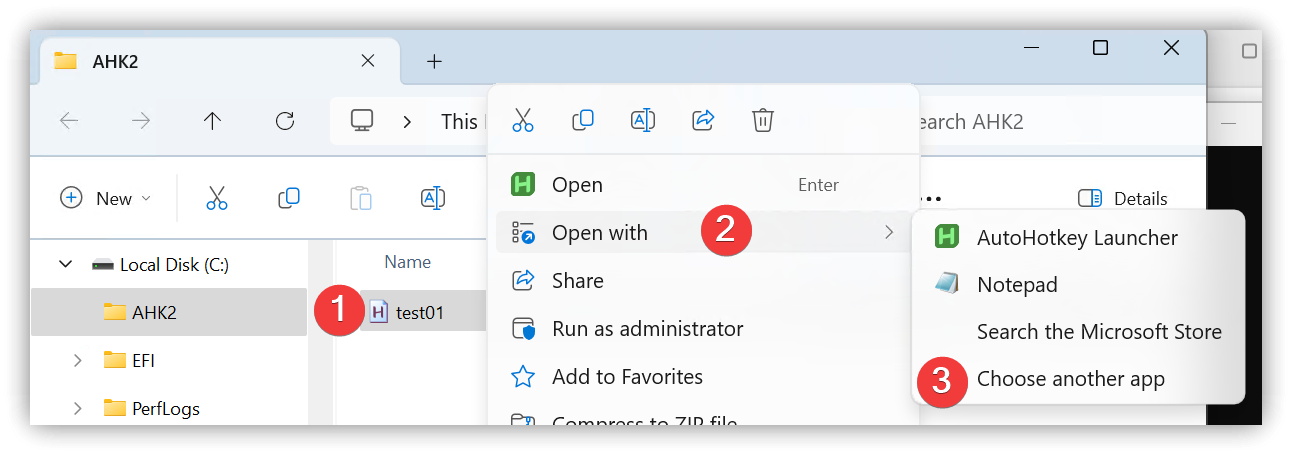
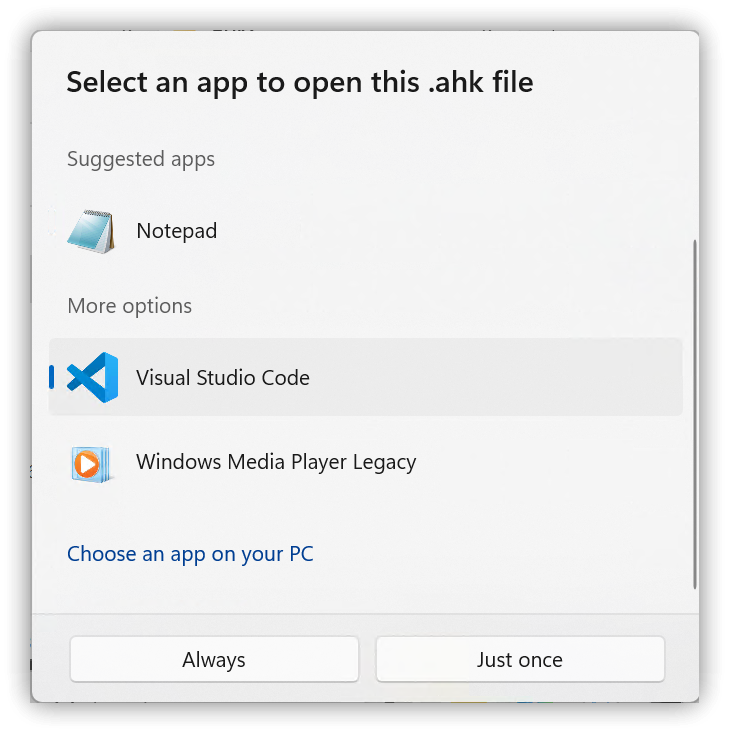
  2. 點選檔案後按右鍵功能表→Open with→Choose another app→Visual Studio Code→Always

gh|700

gh|500

5.1. VS Code編輯

  • 因尚未設定檔案關聯,VS Code純文字格式開啟test01.ahk
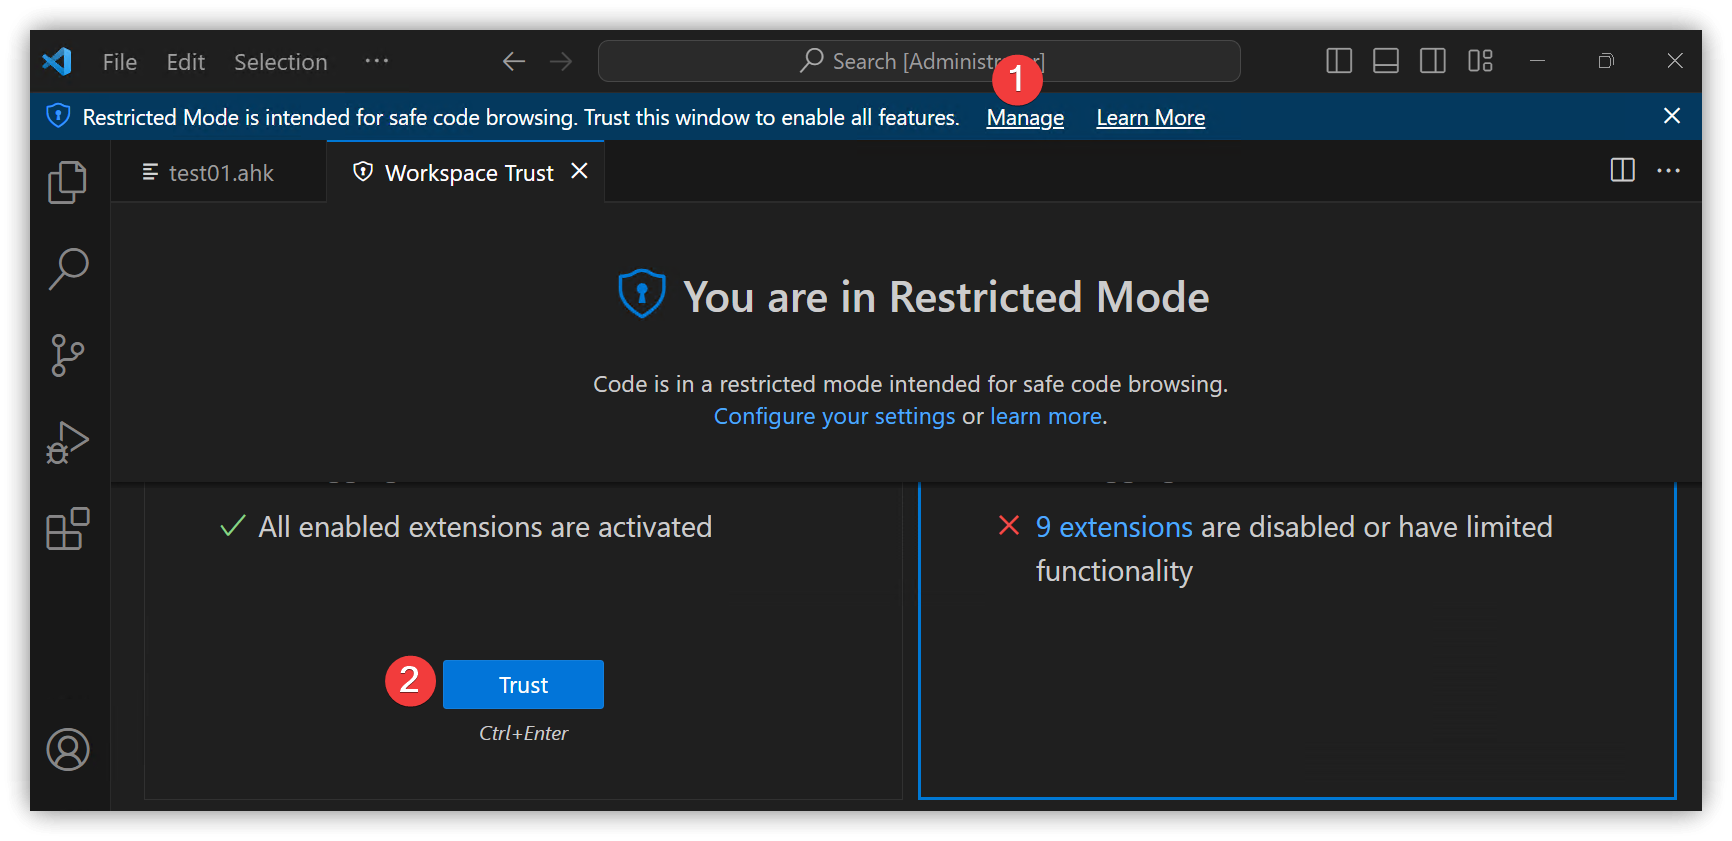
  • VS Code必須開啟C:\AHK2資料夾為信任模式→點擊Manage→Trust,再切換回 test01.ahk 後,右下角已偵測到語言AutoHotkey v2

gh|700

  • 輸入下列指令:
    MsgBox "Hello!"

5.2. 執行

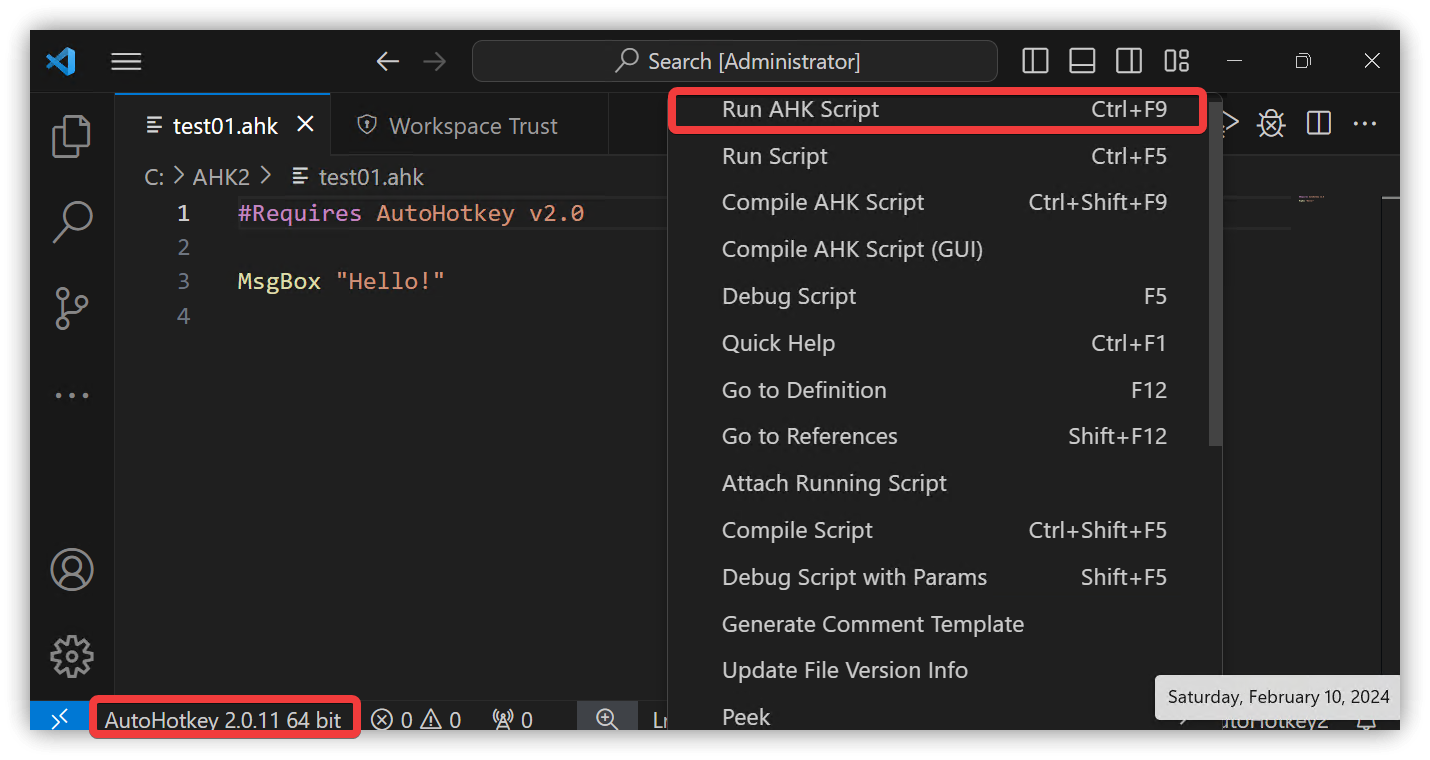
  • 右鍵功能表 Run AHK Script可執行編輯中的腳本
    gh|700

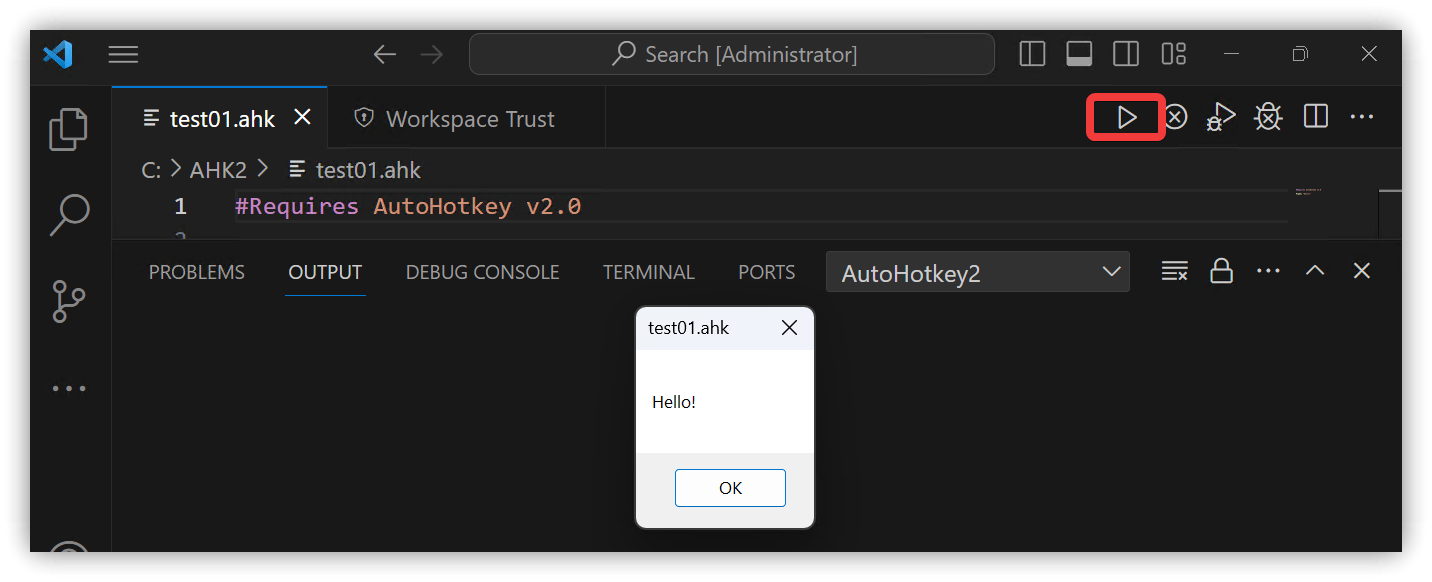
  • 也可點擊工具欄裡的三角形執行貼在本
    gh|700

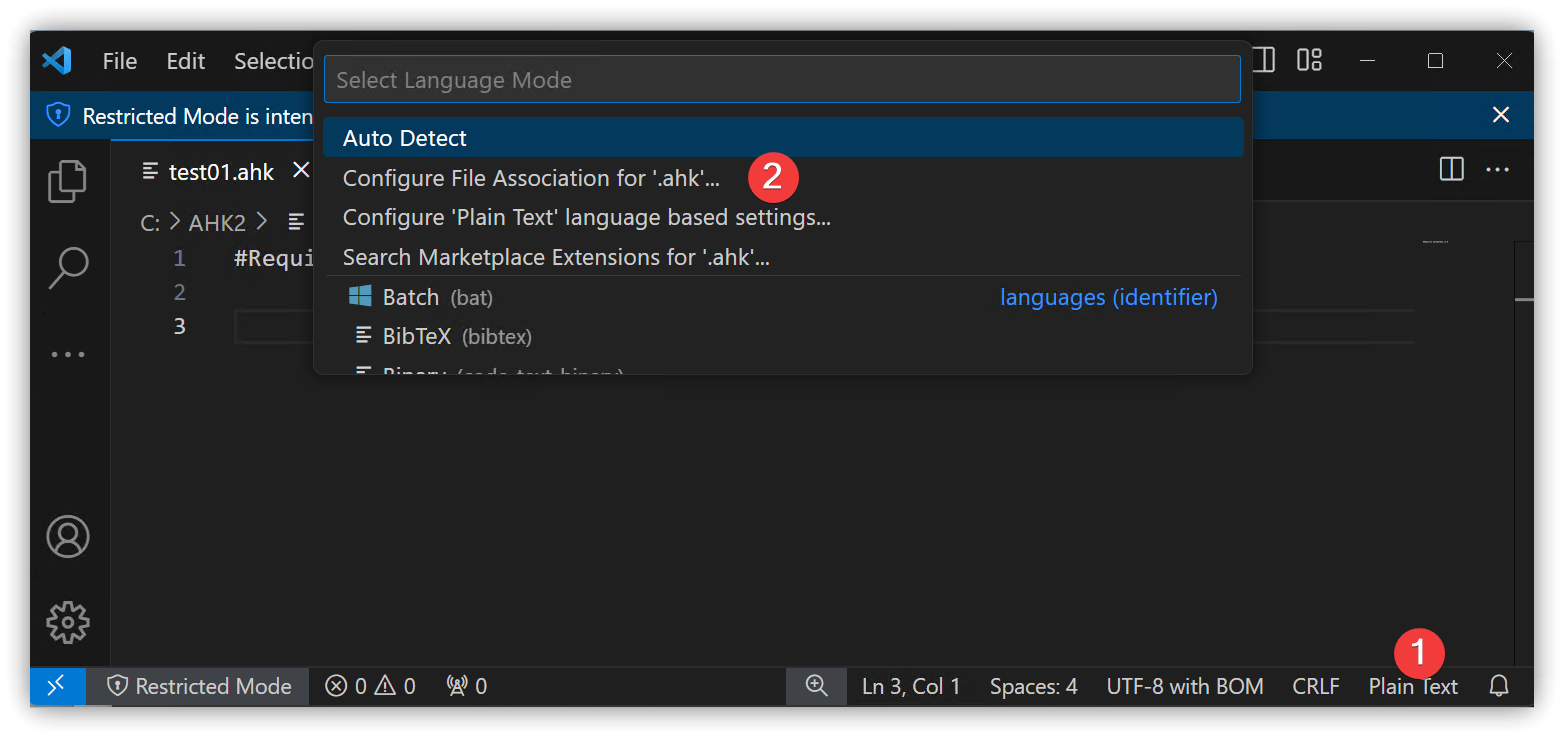
  • 點擊右下角的【Plain Text】以開啟命令面板→點擊【Configure 'Plain Text' language based settings...】
    gh|700

5.3. 除錯

  • 在行號左側點擊一下以設置中斷點

  • 點擊工具欄的Debug圖示
    gh|700

  • 除錯模式下會有除錯工具欄,左側則會出現除錯面板
    gh|700

6. 相關鏈接

7. 教學影片

https://youtu.be/4oHYC_xXtwc

##

您可能也會有興趣的類似文章

Obs152|終於能產生書籤與頁碼了!與PDF相關的外掛:Better Export PDF&PDF++ ## 1. Better Export PDF Plugin

$
0
0

增強PDF匯出功能:

  • 添加頁首(頁眉)與頁尾(頁碼/頁數)
  • 能與[[#^e5003e|Dynamic TOC]]外掛整合→保留文檔內鏈接跳轉
  • 產生PDF大綱書籤
  • 產生前預覽對話窗

gh|700

gh|700

[!WARNING]+ 注意
Dynamic TOC作者不再維護,必須手動安裝 Aidurber/obsidian-plugin-dynamic-toc: An Obsidian plugin for creating Tables of Contents that stay updated with your document

^e5003e

1.1. 與Commander整合

  • 在Tab Bar新增【Better Export PDF: Export Current File to PDF】按鈕,以方便匯出PDF操作

gh|700

1.2. 頁首(頁眉)

<div style="width: 100vw;font-size:10px;text-align:center;"><span class="title"></span></div>

1.3. 頁尾

▼ 原有內容:

<div style="width: 100vw;font-size:10px;text-align:center;"><span class="pageNumber"></span> / <span class="totalPages"></span></div>

將檔名與頁碼放置在頁尾(檔名佔視窗寬度的80%,頁碼佔20%):

<div style="width: 80vw;font-size:10px;margin-left:20px;float:left;"><span class="title"></span></div>
<div style="width: 20vw;font-size:10px;text-align:right;margin-right: 20px"><span class="pageNumber"></span> / <span class="totalPages"></span></div>

1.4. AnuPpuccin佈景主題修改

預設的AnuPpuccin佈景主題產生的PDF頁面是灰色背景色,可使用下列CSS修改成白色背景色:

@media print {
  .anp-print .print, body.anp-print, .anp-print .markdown-rendered, :root:has(.anp-print), :root {
    background-color: white;  /*rgb(var(--ctp-base));*/
  }
}

2. PDF++ Plugin

PDF++是Obsidian內建的PDF檢視器的功能擴充。

[!WARNING]+ 注意
PDF++必須手動安裝或使用BRAT安裝。

選取標籤一段區塊後,點擊上方的重點按鈕,此時標示內容會被複製到剪貼簿,到筆記裡按Ctrl+V貼入,PDF即會出現高亮背景色。

gh|700

2.1. 使用Callout

PDF++也設置了自己的Callout外觀,在設定裡啟用後即可使用:


再將複製的Highlight內容改成Callout語法:

> [!PDF|red] Title
> The Styles menu on the Menu bar (Figure 189) provides the most commonly used paragraph, character, and list styles, plus quick links to create and edit styles. To

[[WG76-WriterGuide.pdf#page=188&selection=137,0,142,74&color=red|p.188]]

3. 相關鏈接

✅ Better Export PDF: https://github.com/l1xnan/obsidian-better-export-pdf
✅ PDF++: https://github.com/RyotaUshio/obsidian-pdf-plus
✅ Obsidian Annotator: https://github.com/elias-sundqvist/obsidian-annotator
✅ Dynamic TOC: https://github.com/Aidurber/obsidian-plugin-dynamic-toc
✅ Obsidian commander: https://github.com/phibr0/obsidian-commander

4. 教學影片

##

您可能也會有興趣的類似文章

Obsidian Soundscapes Plugin停止標題捲動的方法

$
0
0

新版的Soundscapes外掛把使用中的音樂標題改成水平捲動,實在看得有點頭昏。找了一下用CSS片段解決:

.soundscapesroot .soundscapesroot-nowplaying .soundscapesroot-nowplaying-text {
    display: inline-block;
    animation: none;  /* marquee 10s linear infinite; */
}

none; 後面的註解是原本的捲動語法。

##

您可能也會有興趣的類似文章

AHK60|AutoHotkey++擴充設定詳解與Code Snippets設置;使用VS Code

$
0
0

詳細介紹使用VS Code開發AutoHotkey腳本的環境設定,包含VS Code的中文介面安裝、AutoHotkey Plus Plus的.ahk檔案關聯與命令行參數,最後說明AutoHotkey V1與V2建立腳本檔時自動產生的程式碼片段自訂步驟。

學習後能熟悉完整的VS Code開發環境,為日後的開發任務打下穩固的基礎。

1. 安裝語言擴充

擴充→輸入 Chinese→安裝需要的語言擴充

2. AutoHotkey Plus Plus設定

  • 擴充→找到AutoHotkey Plus Plus後→點擊⚙圖示→擴充設定
設定ID 設定值
ahk++.file.helpPathV1 C:/Program Files/AutoHotkey/v1.1.37.01/AutoHotkey.chm
ahk++.file.helpPathV2 C:/Program Files/AutoHotkey/v2/AutoHotkey.chm
ahk++.file.interpreterPathV1 C:/Program Files/AutoHotkey/v1.1.37.01/AutoHotkeyU64.exe
ahk++.file.interpreterPathV2 C:/Program Files/AutoHotkey/v2/AutoHotkey64.exe
  • AHK++增加了下列檔案關聯:
    • 副檔名是.ahk1或.ah1: 是AutoHotkey V1腳本 (藍底圖示)
    • 副檔名是.ahk2或.ah2: 是AutoHotkey V2腳本 (綠底圖示)
    • 副檔名是.ahk: 預設是AutoHotkey V2腳本,可透過命令面板的【為 '.ahk' 設定檔案關聯】變更

3. 建立 v1與v2腳本檔

  • 建立V1腳本時自動插入程式碼片段:AhkTemplateV1 C:/Users/使用者/.vscode/extensions/mark-wiemer.vscode-autohotkey-plus-plus-5.0.3/language/snippetsV1.json
    內的AhkTemplateV1設定。
  • 建立V2腳本時自動插入程式碼片段:AhkTemplateV2 C:/Users/使用者/.vscode/extensions/mark-wiemer.vscode-autohotkey-plus-plus-5.0.3/language/snippetsV2.json 內的AhkTemplateV2設定。

4. 設定VS Code程式碼片段

  • 設定→輸入 ahk 以過濾出AHK++與AutoHotkey 2擴充的設定項目
    • Template Snippet Name V1: AhkTemplateV1 (複製AHK v1片段名稱)
    • Template Snippet Name V2: AhkTemplateV2 (複製AHK v2片段名稱)
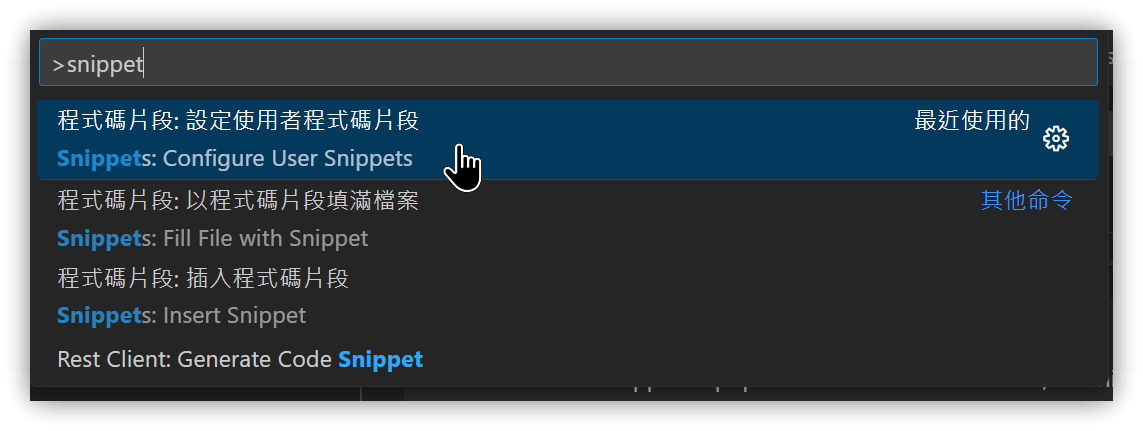
  • Ctrl+P開啟命令面板→輸入snippet→【點擊程式碼片段: 設定使用者程式碼片段】

gh|700

  • 選用 ahk2.json
    gh|700
  "AhkTemplateV2": {
    "prefix": "",
    "body": [
      "#Requires AutoHotkey v2.0",
      "/**",
      " * @version: $CURRENT_YEAR-$CURRENT_MONTH-$CURRENT_DATE $CURRENT_HOUR:$CURRENT_MINUTE:$CURRENT_SECOND",
      " * @author: Jerry",
      " * @Purpose: ${1:AutoHotkey v2 script}",
      "*/",
      "$0"
    ],
    "description": "AutoHotkey V2"
  }
}

body裡可使用 $1, $2 等指定游標停駐順序,換Tab移動,$0是最後一個位置。\${數字:預設值} 會形成停駐點的預設值。

[!TIP]+ 技巧
如果你覺得我的VS Code樣式有點吸睛的話,請參考我的影片:Peacock:五彩繽紛的vs-code擴充

5. 💡 相關鏈接

✅ VS Code下載:https://code.visualstudio.com/download
✅ AutoHotkey下載:https://www.autohotkey.com/download/
✅ 如果你覺得我的VS Code樣式有點吸睛的話,請參考我的影片:Peacock:五彩繽紛的vs-code擴充

6. 教學影片

https://youtu.be/RyHZ-J1KeHs

##

您可能也會有興趣的類似文章


AHK61|Window的AutoHotkey .ahk與.ahk2檔案關聯-使用assoc與ftype命令

$
0
0

1. .ahk檔案關聯

AutoHotkey Plus Plus在VS Code裡設定了 .ahk 與 .ahk2 兩個檔案關聯,分別使用AutoHotkey V1與V2的執行檔,但Windows系統卻未被更動。我們可以用Windows命令assocftype來查詢其設定狀態:

1.1. .ahk初始設定

▼ .ahk的檔案類型是 AutoHotkeyScript,其啟動命令是AutoHotkeyUX.exe (AutoHotkey Launcher)

J:\AHK2>assoc .ahk
.ahk=AutoHotkeyScript

J:\AHK2>ftype AutoHotkeyScript
AutoHotkeyScript="C:\Program Files\AutoHotkey\UX\AutoHotkeyUX.exe" "C:\Program Files\AutoHotkey\UX\launcher.ahk" "%1" %*

J:\AHK2>assoc .ahk2
找不到副檔名 .ahk2 的檔案關聯

1.2. .ahk/.ahk2自訂命令

assocftype分別設定.ahk與.ahk2分別執行v1.1.37.01與v2的執行檔:

J:\AHK2>assoc .ahk=AutoHotkeyScriptV1
.ahk=AutoHotkeyScriptV1

J:\AHK2>ftype AutoHotkeyScriptV1="C:\Program Files\AutoHotkey\v1.1.37.01\AutoHotkeyU64.exe" "%1" %*
AutoHotkeyScriptV1="C:\Program Files\AutoHotkey\v1.1.37.01\AutoHotkeyU64.exe" "%1" %*

J:\AHK2>assoc .ahk2=AutoHotkeyScriptV2
.ahk2=AutoHotkeyScriptV2

J:\AHK2>ftype AutoHotkeyScriptV2="C:\Program Files\AutoHotkey\v2\AutoHotkey64.exe" "%1" %*
AutoHotkeyScriptV2="C:\Program Files\AutoHotkey\v2\AutoHotkey64.exe" "%1" %*

gh|700

2. 💡 相關鏈接

✅ VS Code下載:https://code.visualstudio.com/download
✅ AutoHotkey下載:https://www.autohotkey.com/download/
✅ VSCode擴充 Action Buttons Ext: https://marketplace.visualstudio.com/items?itemName=jkearins.action-buttons-ext
✅ Easy-Auto-GUI-for-AHK-v2: https://github.com/samfisherirl/Easy-Auto-GUI-for-AHK-v2
✅ 如果你覺得我的VS Code樣式有點吸睛的話,請參考我的影片:Peacock:五彩繽紛的vs-code擴充

3. 教學影片

https://youtu.be/YGJebDdb_HI

##

您可能也會有興趣的類似文章

Obs153|快速開啟外掛設定的方法;使用Open Plugin Settings與Advanced URI,透過Templater Hotkeys綁定快捷鍵

$
0
0

Obs089-Quick Settings by QuickAdd Script介紹了透過QuickAdd彙總常用設定再以Advanced URI開啟設定視窗的方法,但因為QuickAdd的概念與操作比較繁複,不曉得有多少朋友有正確的設定起來?因為有新的Open Plugin Settings外掛可以簡化相同功能,因此今天特別再來介紹新的方法:

  1. 第一個作法是透過Open Plugin Settings來產生命令,再用Templater Hotkeys設置快捷鍵。
  2. 第二個作法和先前的作法一樣使用Advanced URI外掛來開啟設定設定視窗,但不再使用QuickAdd而改用Templater Hotkeys。

先介紹兩種作法的Templater腳本,最後再介紹Templater Hotkeys的綁定步驟。

1. Open Plugin Settings Plugin

1.1. Open Plugin Settings安裝與設定

  1. 安裝並啟用Open Settings外掛
  2. 新增需要快速的外掛
  3. 新增後的設定會添加成命令,最常使用的外掛設定即可透過命令綁定快捷鍵

1.2. 撰寫Templater腳本

  • 在Templater資料夾裡建立 Cmd-open-settings.md,內容如下
  • JSON格式:{json} "顯示外掛名稱": "open-plugin-settings:外掛命令代碼"
<%*
// Hotkey: Alt+S
// Open settings plugin必須先設定
let oSettings = {
  "BRAT": "open-plugin-settings:obsidian42-brat", //"obsidian42-brat:BRAT-AddBetaPlugin",
  "QuickAdd": "open-plugin-settings:quickadd", 
  "Open-plugin": "open-plugin-settings:open-plugin-settings",
  "Other settings":"open-plugin-settings:open-other-plugin-settings",
  "Commander": "cmdr:open-commander-settings",  //"open-plugin-settings:cmdr"
  "Keyshots": "keyshots:open-keyshots-settings-tab",
  "Style settings": "obsidian-style-settings:show-style-settings-leaf",
  "Settings": "app:open-settings"
};

let aKeys = Object.keys(oSettings);
let aValues = Object.values(oSettings);

let sValue = await tp.system.suggester(aKeys, aValues, false, "選擇要設定的外掛");  // (displays, values,...)
if (!sValue) return;
// console.log(sValue);
await app.commands.executeCommandById(sValue);
-%>

[!QUESTION]+ 如何得知某個外掛的命令代碼(Command ID)呢?

  1. 方法1:查看 vault/.obsidian/plugins/資料夾外掛的資料夾名稱,此名稱即為其外掛命令代碼
  2. 方法2:vault/.obsidian/plugins/open-plugin-settings/data.json,id 欄位值即為外掛命令代碼

[!TIP]+ 技巧:列出所有命令的簡單方法

  1. Ctrl+Shift+I進入開發工具Console
  2. 輸入並執行 {js} app.commands.listCommands()
  3. 檢查Console,並點擊展開
  4. 點擊再按Ctrl+S複製到系統剪貼簿以方便查看

1.3. 綁定快捷鍵

  • 特定的Open Plugin Setting: 設定→快捷鍵→搜尋Open Plugin Settings的某個項目,綁定快捷鍵,例如Alt+S
  • 設定→Community Plugins→搜尋 Templater→Templater Hotkeys→新增資料,找到Cmd-open-settings
  • 設定→快捷鍵→搜尋 Cmd-open-settings,綁定快捷鍵,例如Alt+S

2. Advanced URI Plugin

2.1. 撰寫Templater腳本

  • 在Templates資料夾裡建立 Cmd-open-settings-by-uri.md,內容如下
  • oSettingsJson 冒號左側是顯示在對話窗的文字
  • oSettingsJson 冒號右側是settingid或命令代碼或檔名
    • settingid:用{js} window.open("obsidian://advanced-uri?vault=VAULT&settingid=...") 開啟設定視窗
    • 含有>:其右側是設定段落(settingsection),例如編輯器設定內的行為(Behavior)即段落,必須與畫面內的值大小寫相同
    • ! 開頭:其右側是命令代碼 (用{js} app.commands.executeCommandById()執行命令)
    • @ 開頭:其右側是筆記檔名(含路徑)
<%*
/**
 * Using Advanced URI Plugin to open specified settings. 
 * settingid: Normally the plugin's folder name. We can find the correct id in plugin's manifest.json
 * Hotkey: Alt+S
 * Ref: Obsidian Advanced URI: https://vinzent03.github.io/obsidian-advanced-uri/actions/settings_navigation
 */
let oSettingsJson = {
  "Core: Appearance": "appearance",
  "Core: Community plugins": "community-plugins",
  "Core: Plugin browser": "plugin-browser",
  "Core: Theme browser": "theme-browser",
  "Core: Hotkeys": "hotkeys",
  "Core: Editor > Behavior": "editor>Behavior",  // ">" indicates settingsection; 行為
  "Plugin: BRAT": "obsidian42-brat>Beta Plugin List",
  "Plugin: QuickAdd": "quickadd", 
  "Plugin: Open-plugin settings": "open-plugin-settings",
  "Plugin: Commander": "cmdr",
  "Plugin: Keyshots": "keyshots",
  "Plugin: Soundscapes": "soundscapes",
  "Plugin: Style settings": "obsidian-style-settings",
  "Plugin: Settings": "app:open-settings",
  "Plugin: Other settings":"!obsidian42-brat:BRAT-opentPluginSettings",  // "!" indicates executes by command ID
  "File: Cmd-open-settings-by-uri.md":"@010-Templates/Cmd-open-settings-by-uri.md",  // "@" indicates opens file (with path)
  //"Other settings":"!open-plugin-settings:open-other-plugin-settings"
};

let aDisplays = Object.keys(oSettingsJson);
let aValues = Object.values(oSettingsJson);

let sValue = await tp.system.suggester(aDisplays, aValues, false, "選擇要設定的外掛");  // (displays, values,...)
if (!sValue) return;
const VALUT = "Your-vault";
//console.log(sValue);
if (sValue.startsWith("!")) { // Command ID
  sValue = sValue.substring(1);
  await app.commands.executeCommandById(sValue);
} else if (sValue.startsWith("@")) { // Open file
  sValue = sValue.substring(1);
  const oFile = await app.vault.getAbstractFileByPath(sValue)
  await  await app.workspace.getLeaf("tab").openFile(oFile);
} else if (sValue.contains(">")) {  // Handle settingsection
  let iIndex = sValue.indexOf(">");
  let sID = sValue.substring(0, iIndex);
  let sSection = sValue.substring(iIndex+1);
  window.open("obsidian://advanced-uri?vault=" + VAULT + "&settingid=" + sID + "&settingsection=" + sSection);
} else {
  window.open("obsidian://advanced-uri?vault=" + VAULT + "&settingid=" + sValue);
}
-%>

2.2. 綁定快捷鍵

  • 設定→Community Plugins→搜尋 Templater→Templater Hotkeys→新增資料,找到Cmd-open-settings-by-uri
  • 設定→快捷鍵→搜尋 Cmd-open-settings-by-uri,綁定快捷鍵,例如Alt+S

3. 操作

  • Alt+S會彈出外掛設定選擇對話窗,擇一執行
  • Other settings會再出現Open Settings以外的外掛選單

4. 💡 相關鏈接

✅ obsidian-open-settings: https://github.com/Lisandra-dev/obsidian-open-settings
✅ Obsidian Advanced URI > Settings Navigation https://vinzent03.github.io/obsidian-advanced-uri/actions/settings_navigation
✅ Obs089 | QuickAdd巨集快速開啟設定視窗-Step by step;直接使用window.open: https://www.youtube.com/embed/g-rtSlHao0g

✅ 腳本1: https://gist.githubusercontent.com/emisjerry/0a1d859d5ea961f21b68ad6025e1b6a3/raw/9e50b1cfdf89c236d70d2a2e3d88991f1c4b1a58/Cmd-open-settings.md

✅ 腳本2: https://gist.githubusercontent.com/emisjerry/5fecaae7a72a72b15daf263c8f6e49a4/raw/6b353707840b6f7116e55abdcc9c674d9c1147c5/Cmd-open-settings-by-uri.md

5. 教學影片

##

您可能也會有興趣的類似文章

WordPress.com將出售內容資料…

$
0
0

如果你在https://wordpress.com寫Blog,要注意一下這個新聞:Tumblr and WordPress to Sell Users’ Data to Train AI Tools

可參考一下這則推文:

##您可能也會有興趣的類似文章

Obs154|Obsidian交互式表格!超強表格控制:視覺美化、分頁、排序、過濾、搜尋

$
0
0

Obsidian v1.5添加的視覺化表格已經提供了表格的編輯功能,而Enhanced Tables外掛則為閱讀模式式的表格強化了更多的控制功能,例如:

  1. 資料美化,能以更直覺的方式呈現內容
  2. 表格分頁:分頁控制讓我們在查看多筆資料時不必一直捲動
  3. 欄位排序:能指定某個欄位以升冪或降冪排列
  4. 資料過濾:能指定過濾的欄位條件
  5. 資料搜尋:輸入關鍵字以過濾出資料

雖然EnhancedTable外掛最近才推出,但功能已算完成,雖尚有些美中不足之處,但它的便利性仍指日可待。

gh|900

1. Templater Hotkeys增加Refresh快捷鍵

目前在使用了Enhanced Table後的表格,當修改了表格屬性後,經常會有渲染(Render)失敗的狀況,尤其是以左右雙面板(左側面板是預覽模式,右側是閱讀模式)時,右側經常會無法正確顯示。

此時需要重新整理(刷新)頁面,但目前Obsidian並未提供Refresh頁面的命令,我們必須使用Templater腳本再綁定快捷鍵來解決(可查看相關鏈接的網頁,有另一個使用User Plugins外掛的解決方案)。

  1. 開啟Templater外掛設定視窗,查看Template folder location,在該資料下附加建立腳本檔 Cmd-reload-page.md
  2. Cmd-reload-page.md內容如下:
<%*
  app.workspace.activeLeaf.rebuildView();
%>
  1. 在Templater外掛設定視窗內的Template Hotkeys清單處,點擊Add new hotkey for templatge→找到Cmd-reload-page.md後按Enter
  2. 設定→快速鍵→找到Cmd-reload-page.md後指定按鍵,例如 Ctrl+R
  3. 順便給【放棄儲存並重新載入程式】設定按鍵,例如Ctrl+Alt+R,日後需要重新啟動Obsidian應用程式時,就可直接按鍵操作

2. 程式碼區塊設定

要使用Enhanced Tables則在表格上方新增一個程式碼區塊,區塊與表格之間必須有一個空行,區塊是YAML格式,基本結構如下:

2.1. 表格結構

```yaml enhanced-tables
date-format: YYYY-MM-DD
datetime-format: YYYY-MM-DD HH:mm
yes-format: "Y"
no-format: "N"
editable: [true | false] 能否編輯
columns:
  表格欄位定義
filter: 預設過濾條件
filters:
  過濾選單設定
sort: 預設排序欄名
pagination
  page-size: 每頁筆數
  page-sizes:
   - 筆數選項
style: |
  自訂樣式(多行)
hide-controls: [true | false] 是否隱藏控制行
hide-configuration: [true | fasle] 是否隱藏程式碼區塊

2.2. 欄位設定

表格第一列的欄名定義:

  欄名:
    alias: 代名
    type: 型別 [[string] | number | date | datetime | time | enum | bool]
    hidden: [true | false]
    nowrap: [true | false]
    editable: [true | false]
    searchable: [true | false]    
    number-format: "style:'currency', currency: 'TWD', minimumFractionDigits:0"
    date-format: "YYYY年MM月DD日"
    yes-format: "✅"
    no-format: "❌"
    formatter: "格式化字串,可為JavaScript運算式或Template literals"
    searchable: true

2.3. 運算式

  • 變數:$row$cell
  • 欄位取存:$row.欄名

2.4. 範例

date-format: YYYY-MM-DD
yes-format: "Y"
no-format: "N"
# editable: true

columns:
  Amount:
    alias: amount
    type: number
    number-format: "style:'currency', currency: 'TWD', minimumFractionDigits:0"
    searchable: true
  UnitPrice:
    alias: price
    type: number
  Quantity:
    alias: qty
    type: number
  SubTotal:
    alias: subtotal
    type: number
    number-format: "style:'currency', currency: 'TWD', minimumFractionDigits:0"
    formatter: "eval(`${$row.price}*${$row.qty}`)"
  Date:
    type: date
    date-format: YYYY年MM月DD日
  Color:
    formatter: "`<span style='color:${$cell}'>${$cell}</span>`"    
    nowrap: true
  Formatted:
    formatter: "`#${$row.Id}) ${$cell}`"
    nowrap: true
  Hidden:
    hidden: true
  Rating:
    type: enum
    enum:
      '1': '⭐'
      '2': '⭐⭐'
      '3': '⭐⭐⭐'
      '4': '⭐⭐⭐⭐'
      '5': '⭐⭐⭐⭐⭐'
    searchable: true
  真假值:
    type: bool
    yes-format: "✔"
    no-format: "❌"
filter: $row.amount > 1200
filters:
 Small numbers: $row.amount < 1200
 High rating: Number($row.Rating) > 3
sort: Rating
# sort: -Rating
pagination:
  page-size: 3
  page-sizes:
   - 3
   - 10
style: |
   th {
     background-color: var(--color-base-50) !important;
     color: var(--color-base-70) !important;
   }
# hide-controls: true
hide-configuration: true
| Id  | Amount | UnitPrice | Quantity | SubTotal | Date       | Rating | Color  | Formatted                        |       Hidden       |   真假值    |
| :-: | -----: | --------: | -------: | -------: | ---------- | :----- | ------ | -------------------------------- | :----------------: | :------: |
|  1  |    500 |       500 |       10 |          | 2024-03-05 | 2      | red    | _**bold**_                       | Text you won't see |          |
|  2  |   1000 |      1000 |       12 |          | 2024-04-10 | 5      | orange |                                  |                    |    N     |
|  3  |   1504 |      1504 |        9 |          | 2024-03-15 | 1      | yellow | <font color="#ff0000">red</font> |                    |    Y     |
|  4  |  10000 |     10000 |        4 |          | 2024-05-01 | 4      | green  | ~~strike~~                       |                    | whatever |
|  5  |  12000 |     12000 |        7 |          | 2024-05-02 | 3      | blue   | $1\frac {4}{5}+\frac {2}{3}=?$   |                    |    Y     |
|  6  |  13000 |     13000 |       22 |          | 2024-05-03 | 4      | purple | `{js} alert('123');`             |                    |    N     |

2.5. formatter

formatter使用JavaScript的樣板字面值(Template literals)。

樣板字面值是允許嵌入運算式的字串字面值(string literals)。${變數}取出變數的值。

`Template literals example: string text ${expression} string text`

SubTotal的formatter:

formatter: "eval(`${$row.price}*${$row.qty}`)"

$row.price是500,$row.qty是10,字面值字串是 \500\*100\
用eval(\500\*100\)執行JavaScript運算。

3. 相關鏈接

✅ obsidian-enhanced-tables: https://github.com/pistacchio/obsidian-enhanced-tables
✅ NumberFormat: https://developer.mozilla.org/en-US/docs/Web/JavaScript/Reference/Global_Objects/Intl/NumberFormat
✅ Creating command to reload page: https://forum.obsidian.md/t/creating-command-to-reload-page/57906

4. 教學影片

##

您可能也會有興趣的類似文章

AHK62|VS Code開發AutoHotkey操作技巧#2

$
0
0

1. IntelliSense快速資訊

將滑鼠游標移動到要查詢的關鍵字上,立即會顯示出該關鍵字對應的說明(IntelliSense)。這個IntelliSense功能是AutoHotkey v2 Language Support擴充提供的,用右鍵→【移至定義】即可開啟其設定檔。

  • IntelliSense定義:C:\Users\帳號\.vscode\extensions\thqby.vscode-autohotkey2-lsp-2.3.4\syntaxes\zh-cn\ahk2.d.ahk
  • IntelliSensey語言說明:C:\Users\帳號\.vscode\extensions\thqby.vscode-autohotkey2-lsp-2.3.4\syntaxes\zh-cn\ahk2.json

2. Quick Help

在要查詢的關鍵字上按Ctrl+F1能開啟對應的Help視窗,即C:\Program Files\AutoHotkey\v2\Autohotkey.chm

3. 自訂工具欄

AutoHotkey有些常用的GUI工具,例如:Window Spy、AHK2EXE等,除了能直接執行對應的 UX*.ahk 腳本檔外,可以透過VS Code的按鈕擴充添加到VS Code的狀態列上,以方便執行。

先將VS Code預設的終端機程式改成cmd.exe: 按Ctrl+P,輸入terminal default,再選用cmd.exe。

gh|700

[!TIP]+ GUI 應用

  1. Easy-Auto-GUI-for-AHK-v2下載由AutoGUI 2.5.8改寫的GUI Builder
  2. 新增 Launch_AutoGUI.exe 到Action Buttons
  1. 安裝VS Code的VSCode Action Buttons Ext擴充
  2. 擴充設定→直接修改VS Code的設定JSON檔:C:\Users\帳號\AppData\Roaming\Code\User\settings.json

gh|700

  • 範例

    "actionButtons": {
    
    "reloadButton": "♻", /* Custom reload button text */
    "defaultColor": "#ff0034", /* Can also use string color names */
    "loadNpmCommands": false, /* Disables automatic generation of actions for npm commands */
    "commands": [
        {
            //"cwd": "c:/util/AutoGUI", /* Terminal initial folder */
            "name": "🕵Spy",
            "color": "light-green",
            "singleInstance": true,
            "command": "\"C:/Program Files/AutoHotkey/v2/AutoHotkey64.exe\" \"C:/Program Files/AutoHotkey/UX/WindowSpy.ahk\"",
        },
        {
          "name": "🎯Dash",
          "color": "light-green",
          "singleInstance": true,
          "command": "\"C:/Program Files/AutoHotkey/v2/AutoHotkey64.exe\" \"C:/Program Files/AutoHotkey/UX/ui-dash.ahk\"",
        },
        {
          "name": "🏃‍♂Ahk2Exe",
          "color": "light-green",
          "singleInstance": true,
          "command": "\"C:/Program Files/AutoHotkey/v2/AutoHotkey64.exe\" \"C:/Program Files/AutoHotkey/UX/Ahk2Exe.ahk\"",
        },
        {
          "name": "🎨AutoGUI",
          "color": "light-green",
          "singleInstance": true,
          "command": "c:/util/AHK/Easy-auto-GUI/Launch_AutoGUI.exe",
        },
        {
            "name": "🪟Split editor",
            "color": "orange",
            "useVsCodeApi": true,
            "command": "workbench.action.splitEditor"
        },
         /*{
            // example for esp-idf oriented command
            "name": "Flash",
            "terminalName": "ESP-IDF 4.4 CMD",
            "color": "red",
            "useVsCodeApi": false,
            "ignoreCwd": true,
            "ignoreClear": true,
            "command": "idf.py -p ${port} flash",
            "extraCommands": [
                "idf.py -p ${port} monitor"
            ]
        }*/    ],
    "customVars": {
        "port": "COM4" /* Can be used in command as `${port}`*/
    }
    },

[!TIP]+ 技巧
如果你覺得我的VS Code樣式有點吸睛的話,請參考我的影片:Peacock:五彩繽紛的vs-code擴充

4. 💡 相關鏈接

✅ VS Code下載:https://code.visualstudio.com/download
✅ AutoHotkey下載:https://www.autohotkey.com/download/
✅ VSCode擴充 Action Buttons Ext: https://marketplace.visualstudio.com/items?itemName=jkearins.action-buttons-ext
✅ Easy-Auto-GUI-for-AHK-v2: https://github.com/samfisherirl/Easy-Auto-GUI-for-AHK-v2
✅ 如果你覺得我的VS Code樣式有點吸睛的話,請參考我的影片:Peacock:五彩繽紛的vs-code擴充

5. 教學影片

https://youtu.be/55Wjs3qxZXY

##

您可能也會有興趣的類似文章

Viewing all 904 articles
Browse latest View live